
Now quite a lot of our TH8s and TH9s have stopped using dragon armies and have moved over to GoWi attacks it’s worth reviewing how these attacks work and the basic strategy around troop deployment. A GoWi attack (GoWiPe, GoWiVa, GoWiWi…) all have a standard form though there are variations at TH9/10 due to additional spells and larger camps, however the fundamentals can be learnt at TH8. A GoWi attack is designed to enable you to take a TH reliably for a one star win, and potentially two, or three if you are lucky.
It’s always best learning from an example, rather than just the theory, so I will walk through an attack from this week’s mid-week clan war where Joe (TH8 and our #1 in the war team) attacked their #1 (TH9) with a well played GoWiPe.
First, let’s look at the army composition and the purpose of each troop. Joe went in with this army –

The three main parts of the army are –
- The tanks, GOLEMS, which are used to take incoming defensive fire and protect your other troops.
- The clutter clearers, WIZARDS, whose sole purpose is to get rid of anything that might distract your “hammer”, they are not the attack troops…
- The hammer, PEKKAs and King, the troops who will smash the TH and give you the win.
There are many variations on this but the two rage spells are important as we’ll see. Also some people take a lightning to deal with enemy clan castle troops or some archers/minions to do a clear-up for a clutch win, but Joe’s army is in a fairly pure form so serves as a great example of the attack.
So on to the actual attack, and throughout the commentary I will add a colour in square brackets to show you where on the screenshots to look, so if I write [red] look for the red markers on the picture to see what the text is refering to.
Phase 1 : The Plan
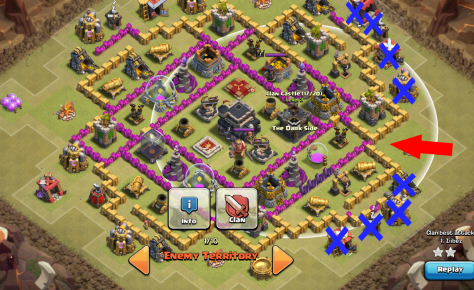 We of course scout the base first and decide which direction our attack should come from. Here Joe decides to attack from the right [red], and many people like attacking from a corner with only two golems, but it depends on the base. Our goal here is to make sure the hammer can head towards the TH by clearing all the external structures or clutter [blue]. This attack direction also has the advantage in being able to lure the enemy CC troops and attack the Archer Queen early, you don’t won’t her alive towards the end of the attack. In clan chat you’ll hear our highest level players talk about “attacking queen-side”, and this is exactly what me mean, attack close to the Archer Queen to take her down early while you have a lot of firepower.
One really important point, once you have decided on your attack direction that’s it, do not change your plan. Go with it, if you’ve studied the base, the clutter etc. you should be on for a win.
Phase 2 (optional) : The Lure
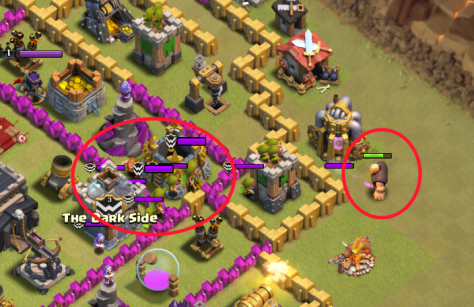
At TH8 enemy clan castle troops can be deadly so here Joe decides to lure them out to find our what’s in there. He does this by deploying a giant to lure out the troops [red]. Seems like there’s nothing here to worry about, just some mid-level wizards and archers so the golems will be able to take hits from those for a while, so it’s now time to get the proper attack started.
Phase 3 : Tank it up !
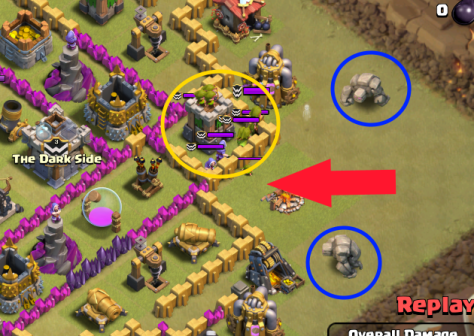
In the first phase we deploy our tanks [blue] to deal with incoming fire, and in this attack to soak up damage from the clan castle troops [yellow]. Note how the deployment is either side of the attack direction [red] so the golems attract attacks from as many defences as possible.
Phase 4 : Clear the clutter
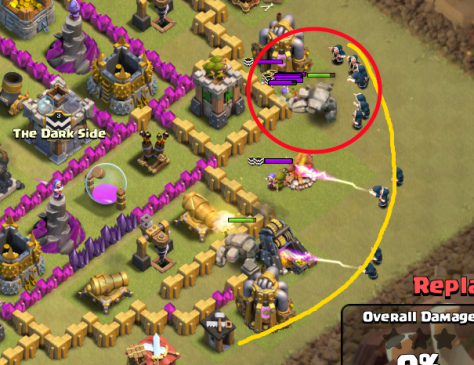
Now this stage is critical, we have to get rid of everything that will divert the hammer away from the TH, so wizards with their high damage per second are ideal and should be deployed in an arc [yellow] behind the tanks (golems). Note here that Joe did an excellent deployment by clustering more wizards close to the enemy troops [red] so the wizards target them and save the golem some health.
Phase 5 : Break in

So the clutter is being cleared, but our hammer might be distracted if structures are behind walls so we now deploy our wall breakers [red] to clear the path. This is normally the point where the first rage spell is used. Raged wall breakers move very quickly so take little incoming fire and are therefore are more likely to take out the walls.
Phase 6 : It’s hammer time !
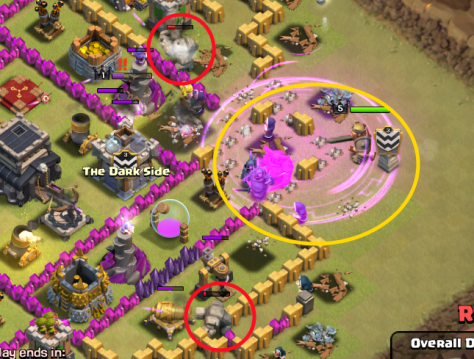
Clutter cleared, walls broken open, then it can only mean one thing; TIME FOR THE HAMMER ! We deploy all our main attack troops [yellow]. In this case PEKKAs and heroes, but it could be Valkyries in a GoWiVa or witches in a GoWiWi. Here we see the hammer, four PEKKAs (including one from the clan castle) and the King use the remains of the wall breakers rage spell (a really good thing) and head directly towards the Town Hall. This attack is now a virtually guaranteed win. Note that there are still golems / golemites [red] who are alive and absorbing damage that would be targeting our main troops.
Phase 7 : The swerve

So the hammer is on track but not quite at the TH yet, so we let this run until they move towards the TH ready for the next phase…
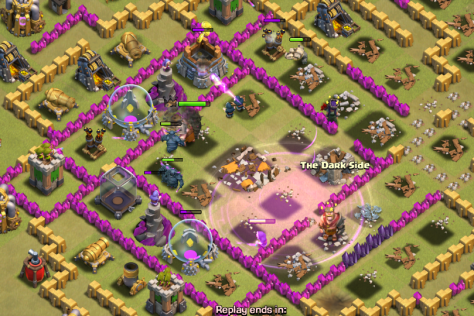
Phase 8 : Victory !

Now is the time to deploy the second rage spell to cover the hammer hitting the town hall, It will go down so quickly with the huge amount of damage per second that has been dropped there. That’s the first star and then we don’t really have any more control so it’s just a waiting game to see if the second or third star will be won. At TH8 the second star should be almost guaranteed if the attack was played well. Note that in this raid a golemite and a couple of wizards were still alive to assist, but also note that the King and PEKKAs are almost on full health.
Phase 9 : Nothing left to do
So now we just let the attack play out and see what we get. Here the hammer is still alive and dealing big damage.
Phase 10 : The end

So the attack ends with an epic two star win and 86% damage. A great attack against a TH one level up and a potential three star, though that is more down to luck than anything else.
Please bear in mind that this is a classic GoWiPe, there are variations, use a lightning spell, use clear up troops etc. but all the essential parts of the attack were executed very well here.
TH8s If you can execute this strategy correctly you will win almost all your attacks against other TH8s. Once you move up to TH9/10 there is a little more flexibility, and complexity, but get the basics right and you will be a good place to be great higher TH level attacker. Good luck TH8s, if you can deliver attacks like this we’re on for a lot more war wins !
